Super Mario 64 Decompilation on Void Linux
Posted by Dave Eddy on Sep 09 2020 - tags: techSuper Mario 64 is one of my all-time favorite games. Last year, the source code for the decompilation project was made available to the public. I won’t go into detail on the decompilation project itself (see this post here for more information), but instead will focus on getting Super Mario 64 compiled on Void Linux.
Getting Started
A couple of dependencies will need to be installed that will be used throughout
the installation process. Note that root privileges are only required in
commands where sudo is used - the rest of the commands can be run as an
unprivileged user.
sudo xbps-install git
sudo xbps-install make
sudo xbps-install wget

mkdir ~/dev ~/src
For this guide, the sm64 source code will be checked out into ~/dev, and the
required dependencies that are installed manually will be in ~/src, of which
there are 2:
qemu-irixbinutils-mips64
qemu-irix
To install this package, I found it easiest to take the qemu-irix release as a
.deb file from the n64decomp GitHub organization and extract the deb
myself.
In order to do this, you must first install a couple of dependencies:
sudo xbps-install binutils # installs 'ar'
sudo xbps-install libglib-devel
sudo xbps-install xz

mkdir ~/src/qemu-irix
Then, pull the package and “install” it (in this case, just extract it):
cd ~/src/qemu-irix
wget https://github.com/n64decomp/qemu-irix/releases/download/v2.11-deb/qemu-irix-2.11.0-2169-g32ab296eef_amd64.deb
ar x qemu-irix-2.11.0-2169-g32ab296eef_amd64.deb
tar xf data.tar.xz
Finally, test the installed qemu-irix program to ensure it runs:
$ ./usr/bin/qemu-irix -version
qemu-irix version 2.11.50 (v2.11.0-2169-g32ab296eef-dirty)
Copyright (c) 2003-2017 Fabrice Bellard and the QEMU Project developer
binutils-mips64
This package will be installed manually, so a C compiler is required. Install
gcc with:
xbps-install gcc

mkdir ~/src/binutils
Then, pull the source code and prepare it for compilation:
cd ~/src/binutils

wget ftp://ftp.gnu.org/gnu/binutils/binutils-2.35.tar.xz
tar xf binutils-2.35.tar.xz
cd binutils-2.35/

sed -i "/ac_cpp=/s/\$CPPFLAGS/\$CPPFLAGS -O2/" libiberty/configure
I don’t know if the sed command is strictly necessary - I based this process
off of the mips64-elf-binutils PKGBUILD file used by the
package in the AUR (for Arch Linux).
Next, compile the package:
./configure --target=mips64-elf --prefix=/usr --with-sysroot=/usr/mips64-elf --with-gnu-as --with-gnu-ld --enable-64-bit-bfd --enable-multilib --enable-plugins --disable-gold --disable-nls --disable-shared --disable-werror
make
Next, “install” the package into a local directory:
make "DESTDIR=$PWD/dest" install
Finally, test that the program works by executing mips64-elf-as:
$ ./dest/usr/bin/mips64-elf-as -version
GNU assembler (GNU Binutils) 2.35
Copyright (C) 2020 Free Software Foundation, Inc.
This program is free software; you may redistribute it under the terms of
the GNU General Public License version 3 or later.
This program has absolutely no warranty.
This assembler was configured for a target of `mips64-elf'.
Compile SM64
Finally, we are able to compile Super Mario 64!
Install the required dependencies:
sudo xbps-install audiofile-devel
sudo xbps-install python3
Clone the project from GitHub:
cd ~/dev
git clone git://github.com/n64decomp/sm64.git
cd sm64
In order to avoid any legal issues, the static assets from SM64 are NOT shipped with the decompiled source code. You must supply a rom to use as a “base”. In our case, we will need the following rom with the exact sha1 hash:
$ sha1sum 'Super Mario 64 (U) [!].z64'
9bef1128717f958171a4afac3ed78ee2bb4e86ce  Super Mario 64 (U) [!].z64
I can’t tell you where to get this rom so please don’t ask - but once you have the rom, move it into the decompilation repository and name it as follows:
mv ~/'Super Mario 64 (U) [!].z64' baserom.us.z64
Now we are almost ready to begin the compilation! The final step is to setup
our PATH to use the programs we installed above. This step should be done
once per session before you want to compile or recompile Mario.
PATH=$PATH:~/src/binutils/binutils-2.35/dest/usr/bin:~/src/qemu-irix/usr/bin
And finally, compile it!
$ make
...

build/us/sm64.us.z64: OK
Success! Part of the make process is that the sha sum being compared to the
expected base rom, but we cany verify the output file manually with:
$ sha1sum build/us/sm64.us.z64
9bef1128717f958171a4afac3ed78ee2bb4e86ce  build/us/sm64.us.z64
Test The Rom
All of the above steps can be run on a headless Void Linux installation. The
file ./build/us/sm64.us.z64 is created by the compilation process and can be
used in any N64 emulator or even sent to a fashcart like the everdrive and ran
on a real N64.
We can also test this on Void Linux with mupen64plus, assuming there is a
windowing system installed and it is not a server/headless installation.
sudo xbps-install mupen64plus
Then, to test the rom:
mupen64plus --gfx mupen64plus-video-glide64mk2 --audio mupen64plus-audio-sdl --windowed ./build/us/sm64.us.z64
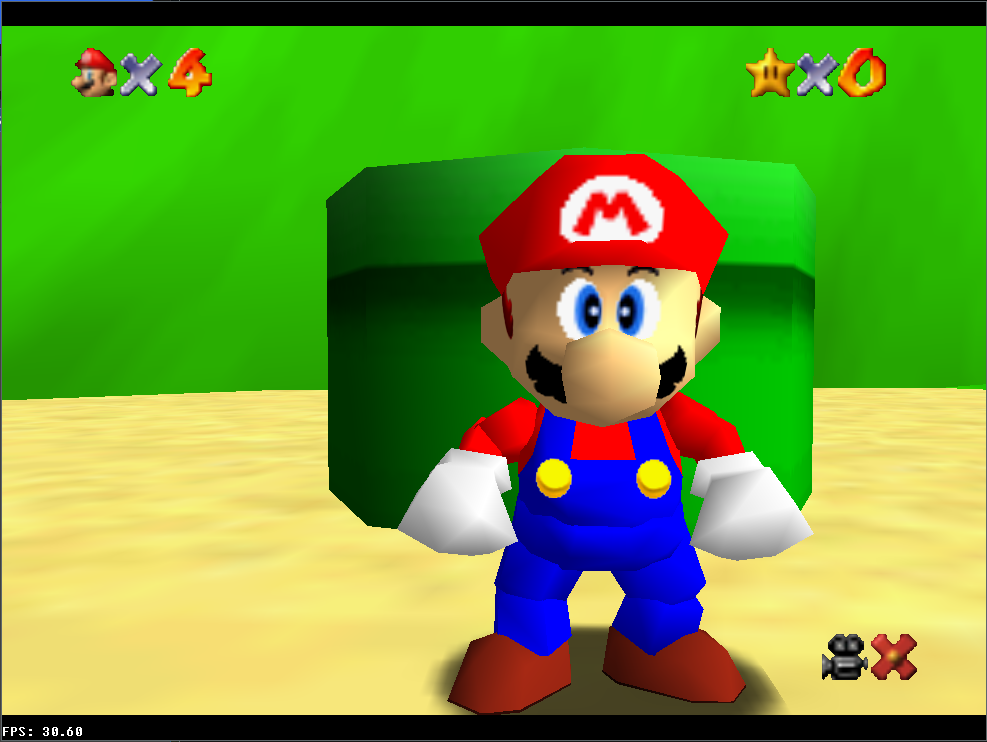
You can pass whatever options you like, but I find these create the most performant result. I also use a raphnet N64 to USB adapter to be able to use an original N64 controller on my computer.
This screenshot shows Mario is working as expected!
Rom Hacking
With all of this in place, we now have C source code that can be compiled perfectly into a Super Mario 64 rom file. As such, we are free to make any modifications to the source code we like.
As a simple example I had an idea for a (terrible) basic rom hack. When Mario is a certain distance away from the camera, for performance reasons, his high quality model is replaced with a low-polygon version of his model. This can become apparent during boss fights or when the camera is fixed, such as in the big house on Rainbow Ride. The idea is to make the low-poly version of Mario the default model regardless of camera distance.
In searching the source code to figure out how this logic is handled, I ended
up actually learning something I didn’t know! This block comment in
./src/engine/graph_node.h explains what I didn’t know:
/** GraphNode that only renders its children if the current transformation matrix
 *  has a z-translation (in camera space) greater than minDistance and less than
 *  maxDistance.
 *  Usage examples: Mario has three level's of detail: Normal, low-poly arms only, and fully low-poly
 *  The tower in Whomp's fortress has two levels of detail.
 */
It turns out Mario has 3 levels of detail! I wasn’t aware of the “medium” level which is low-poly arms only. So already I’ve learned something new about this game!
Now, onto hacking - ./actors/mario/geo.inc.c controls the Mario model. The
variables mario_geo_render_body and mario_geo are the important ones to
note here. Starting with the first function:
// 0x17002D7C
const GeoLayout mario_geo_render_body[] = {
   GEO_NODE_START(),
   GEO_OPEN_NODE(),
      GEO_RENDER_RANGE(-2048, 600),
      GEO_OPEN_NODE(),
         GEO_BRANCH(1, mario_geo_load_body), // HIGH POLY (normal mario)
      GEO_CLOSE_NODE(),
      GEO_RENDER_RANGE(600, 1600),
      GEO_OPEN_NODE(),
         GEO_BRANCH(1, mario_geo_load_medium_poly_body), // MEDIUM POLY
      GEO_CLOSE_NODE(),
      GEO_RENDER_RANGE(1600, 32767),
      GEO_OPEN_NODE(),
         GEO_BRANCH(1, mario_geo_load_low_poly_body), // LOW POLY
      GEO_CLOSE_NODE(),
   GEO_CLOSE_NODE(),
   GEO_RETURN(),
};
I’ve added comments to better understand when each model is used. We can modify this to always load the medium poly Mario:
// 0x17002D7C
const GeoLayout mario_geo_render_body[] = {
   GEO_NODE_START(),
   GEO_OPEN_NODE(),
      GEO_RENDER_RANGE(-2048, 600),
      GEO_OPEN_NODE(),
         GEO_BRANCH(1, mario_geo_load_medium_poly_body), // HIGH POLY (normal mario)
      GEO_CLOSE_NODE(),
      GEO_RENDER_RANGE(600, 1600),
      GEO_OPEN_NODE(),
         GEO_BRANCH(1, mario_geo_load_medium_poly_body), // MEDIUM POLY
      GEO_CLOSE_NODE(),
      GEO_RENDER_RANGE(1600, 32767),
      GEO_OPEN_NODE(),
         GEO_BRANCH(1, mario_geo_load_medium_poly_body), // LOW POLY
      GEO_CLOSE_NODE(),
   GEO_CLOSE_NODE(),
   GEO_RETURN(),
};
Also, the variable below it needs to be modified as well:
// 0x17002DD4
const GeoLayout mario_geo[] = {
   GEO_SHADOW(SHADOW_CIRCLE_PLAYER, 0xB4, 100),
   GEO_OPEN_NODE(),
      GEO_SCALE(0x00, 16384),
      GEO_OPEN_NODE(),
         GEO_ASM(0, geo_mirror_mario_backface_culling),
         GEO_ASM(0, geo_mirror_mario_set_alpha),
         GEO_SWITCH_CASE(0, geo_switch_mario_stand_run),
         GEO_OPEN_NODE(),
            GEO_BRANCH(1, mario_geo_load_body), // THIS LINE
            GEO_BRANCH(1, mario_geo_render_body),
         GEO_CLOSE_NODE(),
         GEO_ASM(1, geo_mirror_mario_backface_culling),
      GEO_CLOSE_NODE(),
   GEO_CLOSE_NODE(),
   GEO_END(),
};
Changing the line that I commented earlier to match the polygon level we want:
GEO_BRANCH(1, mario_geo_load_medium_poly_body), // THIS LINE
With these two changes in place, we can now recompile our own personalized version of Super Mario 64 that will only use the medium-poly version of Mario.
$ make
...
tools/n64cksum build/us/sm64.us.bin build/us/sm64.us.z64
build/us/sm64.us.z64: FAILED
sha1sum: WARNING: 1 computed checksum did NOT match
The build succeeded, but did not match the official ROM. This is expected if you are making changes to the game.
To silence this message, use "make COMPARE=0".
make: *** [Makefile:339: all] Error 1
It broke?! Well not quite. The build was successful, but the sha1 hash check I
mentioned above failed. This is ok - in fact this is expected - since we are
modifying the source and intend to have a different version. We can instead
run make with a variable set to not compare hashes after the build succeeds:
make COMPARE=0
Now, booting up the run with mupen64plus we can see what medium-poly Mario
looks like.
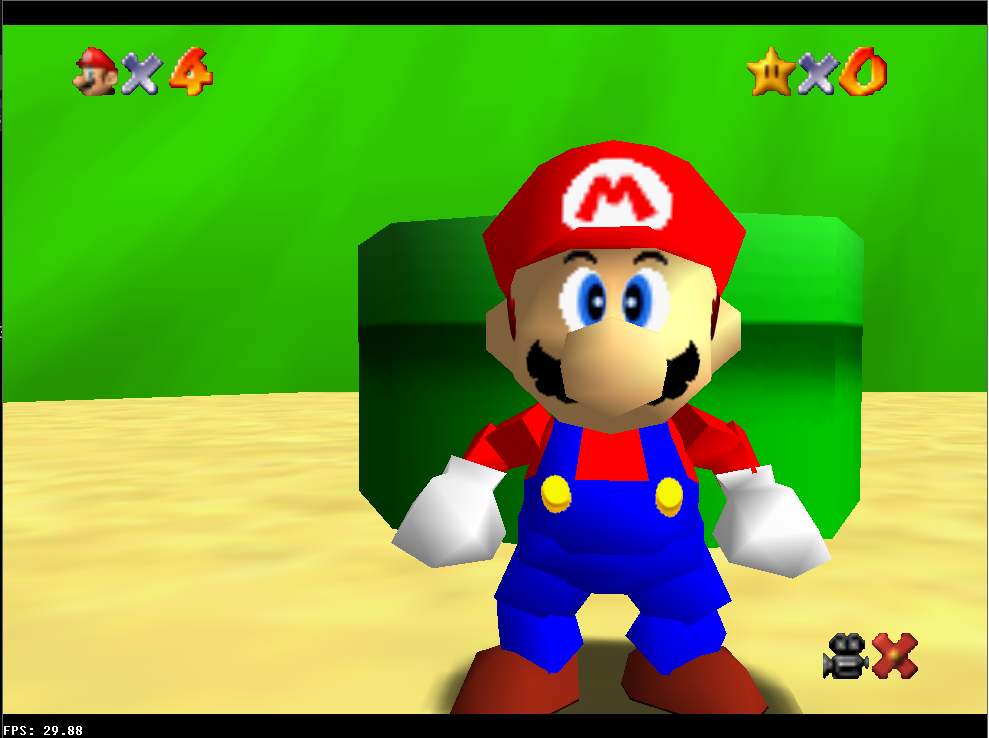
The model looks mostly the same, but you can really see his arms just aren’t quite right.
This is cool, but I think we can make it more cursed. Let’s swap out the
variables to only have low-poly Mario instead. The 2 variables inside
./actors/mario/geo.inc.c should look like:
// 0x17002D7C
const GeoLayout mario_geo_render_body[] = {
   GEO_NODE_START(),
   GEO_OPEN_NODE(),
      GEO_RENDER_RANGE(-2048, 600),
      GEO_OPEN_NODE(),
         GEO_BRANCH(1, mario_geo_load_low_poly_body),
      GEO_CLOSE_NODE(),
      GEO_RENDER_RANGE(600, 1600),
      GEO_OPEN_NODE(),
         GEO_BRANCH(1, mario_geo_load_low_poly_body),
      GEO_CLOSE_NODE(),
      GEO_RENDER_RANGE(1600, 32767),
      GEO_OPEN_NODE(),
         GEO_BRANCH(1, mario_geo_load_low_poly_body),
      GEO_CLOSE_NODE(),
   GEO_CLOSE_NODE(),
   GEO_RETURN(),
};

// This last geo is used to load all of Mario Geo in the Level Scripts

// 0x17002DD4
const GeoLayout mario_geo[] = {
   GEO_SHADOW(SHADOW_CIRCLE_PLAYER, 0xB4, 100),
   GEO_OPEN_NODE(),
      GEO_SCALE(0x00, 16384),
      GEO_OPEN_NODE(),
         GEO_ASM(0, geo_mirror_mario_backface_culling),
         GEO_ASM(0, geo_mirror_mario_set_alpha),
         GEO_SWITCH_CASE(0, geo_switch_mario_stand_run),
         GEO_OPEN_NODE(),
            GEO_BRANCH(1, mario_geo_load_low_poly_body),
            GEO_BRANCH(1, mario_geo_render_body),
         GEO_CLOSE_NODE(),
         GEO_ASM(1, geo_mirror_mario_backface_culling),
      GEO_CLOSE_NODE(),
   GEO_CLOSE_NODE(),
   GEO_END(),
};
Build the new rom with:
$ make COMPARE=0
...
mips64-elf-objcopy --pad-to=0x800000 --gap-fill=0xFF build/us/sm64.us.elf build/us/sm64.us.bin -O binary
tools/n64cksum build/us/sm64.us.bin build/us/sm64.us.z64
Run it with mupen64plus and:
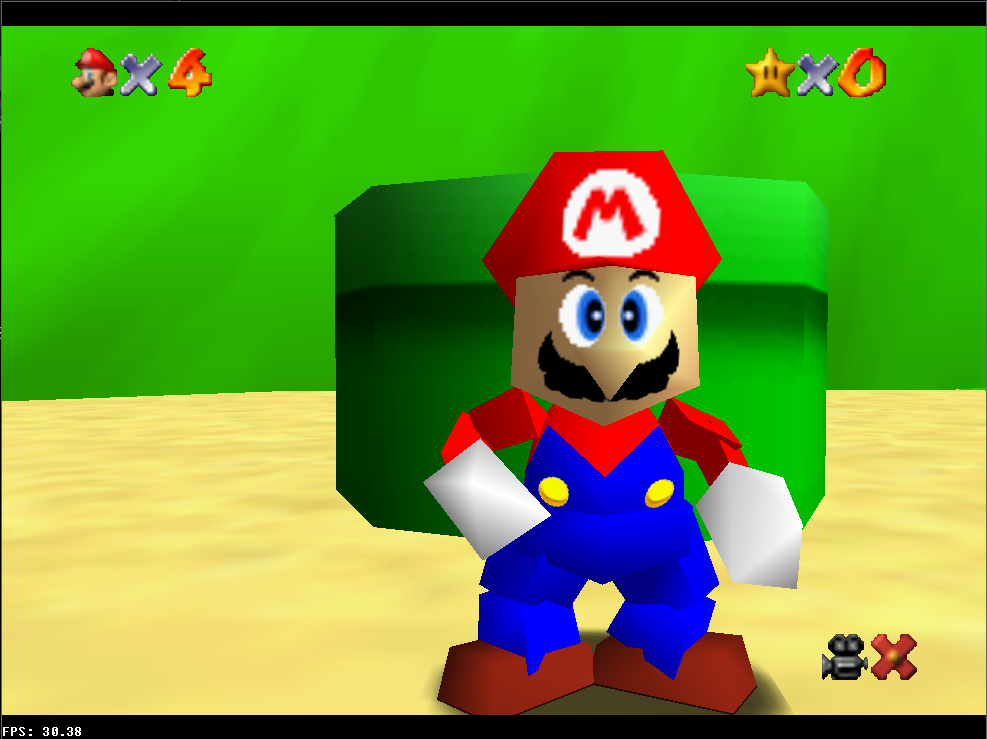
Bam! the most cursed romhack of Super Mario 64 done by only modifying 4 lines of code.
Conclusion
This just scratches the surface of what could be done with the SM64 decompilation project. I hope to do more, and I hope this blog post also inspires you to do something with this :).
Some final thoughts I have are: how could this be made more efficient? If we are always using the same model, do we still need the logic to swap the model at a certain camera distance? Most likely not.
But for now the low-polygon version of Super Mario 64 that no one asked for is now here!
Looking Forward
I’m currently working on my first rom hack! The idea is very simple: toggle the water physics on and off completely with the L button. This means the whether will be completely dry, or completely flooded, with the push of a button. It’s already making for some really cool speedrunning strats:
thanks to the Super Mario 64 decomp project I present to you...
— dave eddy (@bahamas10_) September 9, 2020
cursed sm64 decomp strat 1: ship clip 2.0 pic.twitter.com/Ue57mOkTiD