ThinkPad X1 Carbon Gen 6 BIOS Update
Posted by Dave Eddy on Sep 09 2018 - tags: techI purchased the ThinkPad X1 Carbon (6th Gen) laptop over a month ago and have been happily using Void Linux on it for the last couple of weeks or so. The battery on this thing is absolutely amazing - without any tuning specifically for the battery itself, I can get really great battery life.
I posted about my install on reddit and was asked specifically about the power usage. I said:
I keep firefox with ~15 tabs open and have a couple terminal windows open - that’s my daily workflow, and I can get like 8 full hours on this laptop! Sleeping however is a nightmare. It doesn’t support s3 out of the box and I have yet to try this patch to enable deep sleep - i’ll report back when I do. When the laptop is suspended it’ll last about 48 hours before it is completely dead (WHICH IS TERRIBLE).
However, my friend Mike showed me this tweet showing that the latest ThinkPad BIOS update added support for better sleeping on Linux! I really wanted better battery life when sleeping, so I jumped into trying to update it as fast as I possibly could - and in that process, I learned a lot and failed pretty hard at first. This is my journey into getting a good nights sleep on my ThinkPad with Linux.
fwupdmgr
The first thing I tried was what I saw in the tweet linked above:
pull in the latest BIOS update with fwupd. Since my laptop was supported for
BIOS updates with Linux, I was very excited to test out this method.
I searched for fwupd in my package manager and found it:
$ xbps-query -vRs fwupd
[*] fwupd-1.1.1_1       Daemon to allow session software to update firmware
...
I installed it with:
$ xbps-install fwupd
...
And finally decided to test it out with:
$ sudo fwupdmgr get-updates
ignoring 20KHCTO1WW System Firmware [1c53...] as not updatable
This did not work out at all like I planned it. For some reason, my system was
marked as not updatable. I wasn’t really sure what happened here, but luckily
the get-devices subcommand was a little more helpful:
$ sudo fwupdmgr get-devices
20KHCTO1WW System Firmware
  DeviceId:             1c53...
  Guid:                 a4b5...
  Guid:                 230c...
  Plugin:               uefi
  Flags:                internal|require-ac|supported|registered|needs-reboot
  Version:              0.1.30
  VersionLowest:        0.0.1
  Icon:                 computer
  Created:              2018-09-09
  UpdateError:          /sys/firmware/efi/efivars was not mounted

X1 Carbon Thunderbolt Controller
...snipped...
The UpdateError line was particularly telling:
UpdateError: /sys/firmware/efi/efivars was not mounted
I was able to mount the efivars filesystem to the expected location with:
$ sudo mount -t efivarfs efivarfs /sys/firmware/efi/efivars
I ran get-devices again but was met with the same error. I had to kill the
fwupd daemon that was started automatically for it to pick up the changes.
Just a side note here - I ran fwupdmgr as non-root initially and it resulted
in fwupd running as a daemon as root via dbus. I guess this is convenient,
but I’m not a huge fan of this behavior.
$ sudo pkill fwupd
$ sudo fwupdmgr get-updates
GUID:                    230c8...
ID:                      com.lenovo.ThinkPadN23ET.firmware
Update Version:          0.1.30
Update Name:             ThinkPad X1 Carbon 6th
Update Summary:          Lenovo ThinkPad X1 Carbon 6th System Firmware
Update Remote ID:        lvfs
Update Checksum:         SHA1(1a528d1b227e500bcaedbd4c7026a477c5f4a5ca)
Update Location:         https://fwupd.org/downloads/7bd315afb8ff3a610474b752265e7703e6bf1d5e-Lenovo-ThinkPad-X1Carbon6th-SystemFirmware-1.30.cab
Update Description:      Lenovo ThinkPad X1 Carbon 6th System Firmware

                         CHANGES IN THIS RELEASE

                         Version 1.30

                         [Important updates]
                          • Nothing.

                         [New functions or enhancements]
                          • Support Optimized Sleep State for Linux in ThinkPad Setup - Config - Power.
                          • (Note) "Linux"option is optimized for Linux OS, Windows user must select
                          • "Windows 10" option

                         [Problem fixes]
                          • Nothing.
... snipped ...
Hooray! fwupdmgr finally saw the update available for my BIOS. The last step
was to stage this update with:
$ sudo fwupdmgr update
Downloading 0.1.30 for 20KHCTO1WW System Firmware...
Fetching firmware https://fwupd.org/downloads/7bd315afb8ff3a610474b752265e7703e6bf1d5e-Lenovo-ThinkPad-X1Carbon6th-SystemFirmware-1.30.cab
GLib-GIO-Message: 03:34:29.751: Using the 'memory' GSettings backend.  Your settings will not be saved or shared with other applications.
Downloading…           [***************Decompressing…         [***************************************]
Authenticating…        [***************************************]
Updating 20KHCTO1WW System Firmware from 0.1.23 to 0.1.30…     ]
Scheduling…            [***************************************]

An update requires a reboot to complete. Restart now? [Y|n]: y
No supported backend compiled in to perform the operation.
fwupdmgr doesn’t know how to reboot my operating system, but that’s fine,
because I do:
$ sudo reboot
The Problem
Nothing happened.
The machine came back up and brought me to my normal grub screen to unlock my encrypted hard drive without any indication that the BIOS had been updated.
I tried redoing the update process with fwupdmgr --offline update, but nothing
seemed to cause the BIOS to update. The process itself worked, meaning that
/boot/efi/EFI/void/fwupx64.efi was created along with the fw/ directory to
store the cap file with the updated, but I could not get it to boot that to
save my life.
I started my laptop and hit F12 to bring up the boot menu and manually
selected the Linux Firmware Updater option (which uses the fwupx64.elf
file), but it would just go to a black screen for a split second and then would
go right back to the boot menu select screen.
I modified my BIOS to boot from the Linux Firmware Updater option first, but
still it didn’t work.
I then came across this comment on GitHub for a
somewhat related item and noticed that I had only installed fwupd and not
fwupdate. I installed fwupdate with:
$ sudo xbps-install fwupdate
...
========================================================================

TO use the EFI firmware update executable, copy the /usr/lib/fwupdate/EFI
folder to your EFI partition

========================================================================
I checked out the directory mentioned in the output above and saw it had one file:
$ tree /usr/lib/fwupdate/EFI
/usr/lib/fwupdate/EFI
└── void
    └── fwupx64.efi

1 directory, 1 file
I compared that file with the fwupx64.efi file I already had in
/boot/efi/EFI/void and noticed they were different (they had different sha256
checksums). I copied over this new file with:
$ sudo cp /usr/lib/fwupdate/EFI/void/fwupx64.efi /boot/efi/EFI/void/fwupx64.efi
And still nothing. I could not get this update boot at all.
USB BIOS Update
It was time to take a different approach. I decided to download the update for my laptop directly from the Lenovo Support Page. Lenovo distributes it as a bootable ISO file that is meant to be burned to a CD and installed regardless of whatever operating system is currently installed. I don’t have a CD drive on my laptop, so I instead opted to install it onto a bootable USB drive.
I downloaded the ISO with:
$ wget https://download.lenovo.com/pccbbs/mobiles/n23ur11w.iso
In order to properly copy it to a USB drive, however, I had to convert it to an IMG file. I did this using the geteltorito tool:
$ sudo xbps-install geteltorito
...
$ geteltorito -o bios.img n23ur11w.iso
Booting catalog starts at sector: 20
Manufacturer of CD: NERO BURNING ROM VER 12
Image architecture: x86
Boot media type is: harddisk
El Torito image starts at sector 27 and has 43008 sector(s) of 512 Bytes

Image has been written to file "bios.img".
I then determined the name of my USB stick:
$ lsblk
NAME                 MAJ:MIN RM   SIZE RO TYPE  MOUNTPOINT
sda                    8:0    1  60.1G  0 disk
nvme0n1              259:0    0 238.5G  0 disk
├─nvme0n1p1          259:1    0   500M  0 part  /boot/efi
└─nvme0n1p2          259:2    0   238G  0 part
  └─voidlinux        254:0    0   238G  0 crypt
    ├─voidlinux-swap 254:1    0     2G  0 lvm   [SWAP]
    └─voidlinux-root 254:2    0   236G  0 lvm   /
With that I “burned” that image to the USB stick on /dev/sda:
$ sudo dd bs=4M if=bios.img of=/dev/sda
5+1 records in
5+1 records out
22020096 bytes (22 MB, 21 MiB) copied, 1.99806 s, 11.0 MB/s
I verified this worked by ensuring a new partition had been made on /dev/sda:
$ lsblk /dev/sda
NAME   MAJ:MIN RM  SIZE RO TYPE MOUNTPOINT
sda      8:0    1 60.1G  0 disk
└─sda1   8:1    1   21M  0 part
I then rebooted the laptop, pressed F12 to bring up the boot menu, and booted
from the USB hard drive. It then brought me to a BIOS upgrade page and I was
able to follow the steps there and install the latest BIOS!
After the install I then pressed F1 during the boot sequence to open the BIOS
and configure my machine for Linux style sleep:
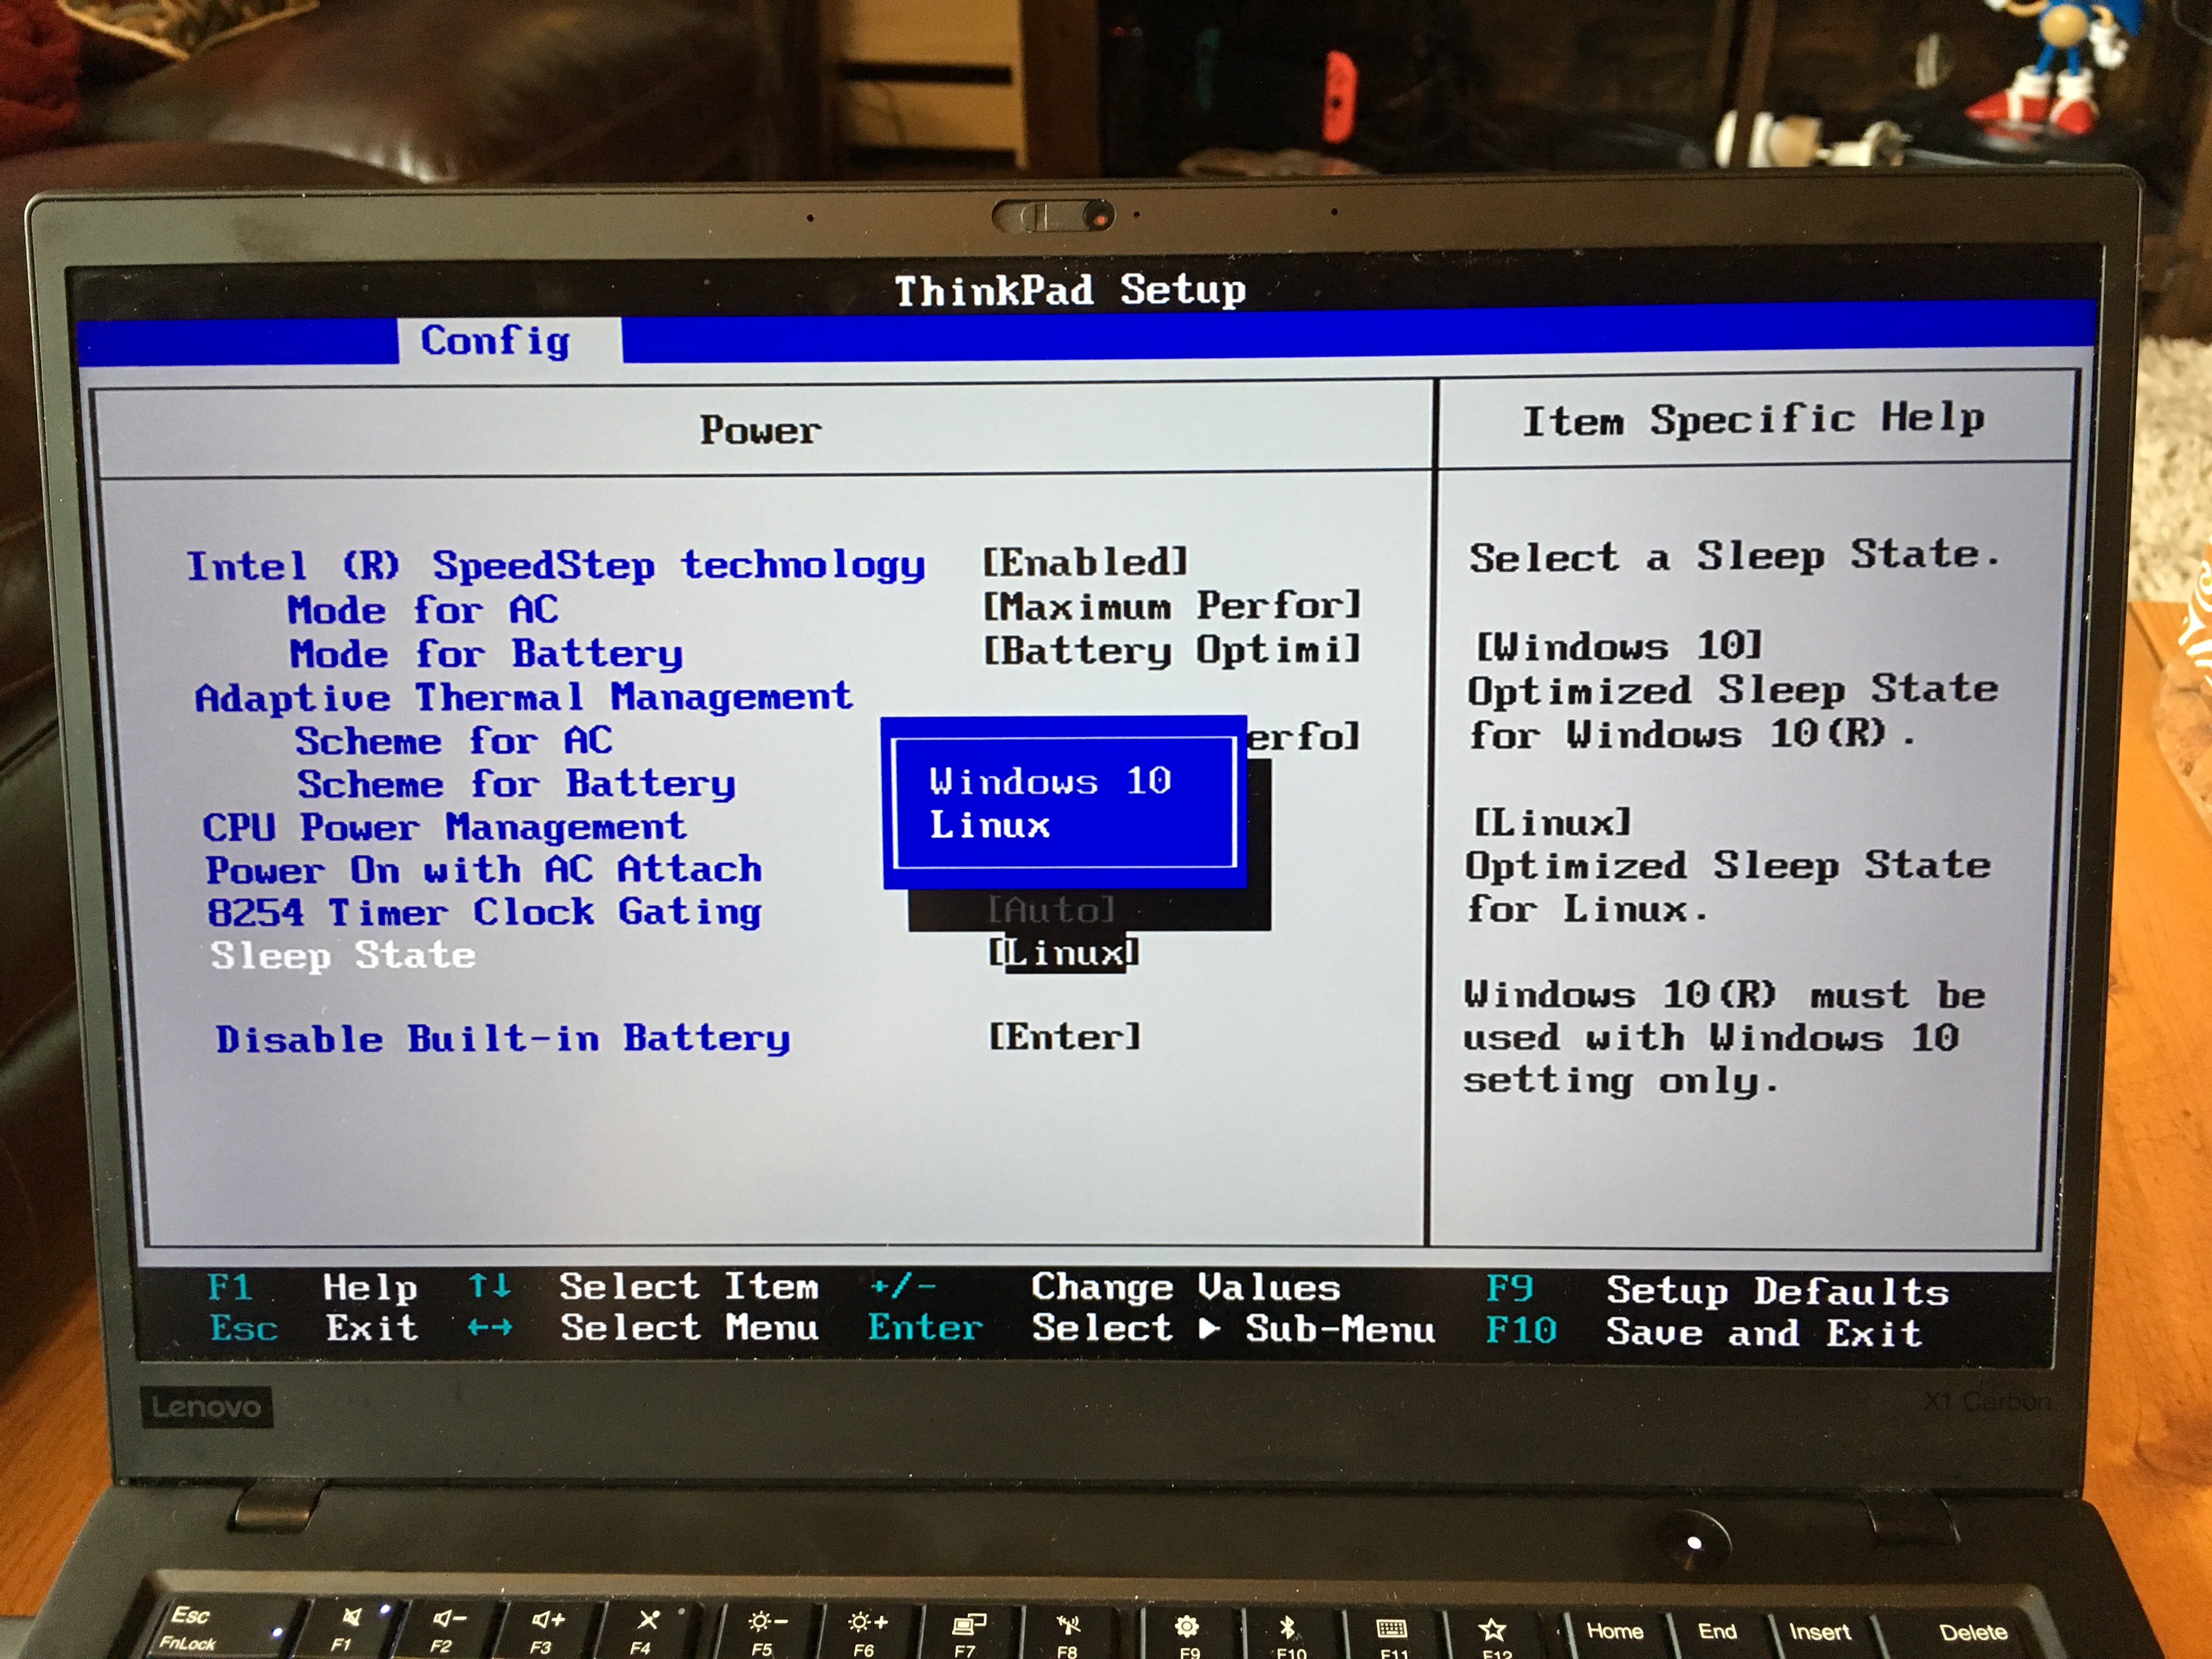
With that, my machine now supports proper s3 deep sleep on Linux! I verified
this with:
$ sudo dmesg | grep 'ACPI: (supports'
[    0.393642] ACPI: (supports S0 S3 S4 S5)
The added bonus here is that my machine now properly wakes up when I open the lid as opposed to having to press the power button to wake it up manually.