Sending Email on the Command Line

Posted by Dave Eddy on Aug 24 2015 - tags: tech

Sending email on the command line is nothing new; In fact, it is not even all that exciting. When I got Nagios up and running at home, I needed an easy way to have it email me whenever there was an alert. When I worked at Voxer as an Operations Engineer I created a program to allow Nagios to generate HTML emails - now all I needed at home was to allow outbound email.

This, however, turned out to be more difficult than I thought, mostly because I was (and largely, still am) ignorant to the intricacies of the various email protocols in use today on the Internet. Joyent released a blog post when I was setting this all up that went over the various options for sending email from a SmartOS server. One of the options they mentioned but didn’t choose to implement really caught my eye: Google’s free SMTP server. Since my main email address is a gmail address (well, Google Apps), this route seemed perfect.

gmailx

gmailx was born! From the documentation:

Send email easily on the command line without running a server

This program is basically mailx but hardwired for Gmail (hence the name). Usage is simple:
Read More...


SmartOS Pkgsrc Caching Proxy

Posted by Dave Eddy on Jul 19 2015 - tags: tech

I have 2 SmartOS servers at home with a total of 17 zones running persistently - a majority of these provisioned with the latest LTS support release of pkgsrc: 2014Q4. All zones are setup to download a similar set of “bootstrap” packages to make them ready to be used. Packages like gcc, git, etc. I pull to all of my zones upon creation.

The problem, however, is my home internet is not the fastest - it usually can pull packages at around 100KB/s. git and gcc alone are responsible for over 100MB of compiled binary data, meaning these initial package downloads can take over 15 minutes per new zone.

A possible solution to speed up initial package downloads I investigated was to rsync the entire pkgsrc tree to a local server, and host it over an internal HTTP server. This, however, required a massive amount of storage dedicated to packages I am almost guaranteed to never use. I could have just pulled 2014Q4, but then I would have been required to add new releases whenever I wanted to upgrade, and keep around the old packages until all my old zones have been upgraded.

Instead, I created a Node.JS HTTP caching server to proxy GET and HEAD requests to Joyent’s pkgsrc server, and cache the data on the local filesystem. The requests will be proxied if the file does not exist locally, and will be dual-written to the requesting client, and the local filesystem. Subsequent requests for the same resource will be streamed from the local filesystem without every making an outbound request.

fs-caching-server

https://github.com/bahamas10/node-fs-caching-server

The program is written to be generic - it allows it to act as a caching proxy to any website, and also allows the user to specify a regex to test a URL when deciding if the request should be cached, or just proxied directly with no cache.

Read More...


SmartOS as a Home Router

Posted by Dave Eddy on May 31 2015 - tags: tech

For the last couple of years I’ve used PFSense as my home router. It’s been great - it’s easy to manage with the web interface, and really easy to add features like an OpenVPN server, bandwidth monitoring, etc.

But, I like to manage all of my servers and zones at home using Chef, and my router has always been left out as it required being configured manually through the web interface. So now, I’ve replaced PFSense with 2 SmartOS zones: 1 for NAT and the other for DHCP - both managed by Chef, and both monitored with Nagios. This also had the added effect of reducing two physical servers at home down to one, for a cheaper power bill.

There are 3 steps required to configure a SmartOS server as a home router replacement.

  1. Add the External Interface
  2. Create the NAT Zone
  3. Create the DHCP Zone

1. Add the External Interface

The first thing is to ensure that you have 2 (or more) NICs on the SmartOS server - one for the external network (The Internet) and one for the internal network that will be behind NAT. To list the interfaces run

root - datadyne sunos ~ # dladm show-phys -m
LINK         SLOT     ADDRESS            INUSE CLIENT
rge0         primary  f4:6d:4:X:XX:XX    yes  rge0
e1000g0      primary  0:4:23:XX:XX:XX    yes  e1000g0

Cross-referencing this information with output from ifconfig(1M) reveals that the e1000g0 interface is not currently in use, and can be used as the external interface.

root - datadyne sunos ~ # ifconfig e1000g0
ifconfig: status: SIOCGLIFFLAGS: e1000g0: no such interface

Read More...


Sonos and SmartOS - Samba Server

Posted by Dave Eddy on May 05 2015 - tags: tech

Sonos is a fantastic product that makes it easy to set up whole-house audio in a piecemeal fashion. I started with one speaker, then a couple weeks later was up to 4 speakers, and a couple months after that the whole house is equipped with enough speakers for music to be heard anywhere.

In order to stream your own music collection to Sonos, it must be available over the network using a supported protocol - sadly at the time of this writing NFS is unsupported by Sonos. In order to get Sonos up and running on my network, I setup a cifs/samba read-only share with my music collection inside a SmartOS zone.

This post is basically a modified version of Jonathan Perkin’s and Thomas Merkel’s posts covering mounting in a shared directory with music using lofs.

create the zone

To create the zone you have to first create a JSON manifest to be used by the vmadm(1M) command. This is the JSON manifest for the cifs zones called cifs.json I used. The filesystems array mounts in /goliath/entertainment from the Global Zone to /entertainment inside the zone. I do this because my entertainment directory is used by multiple zones - for example my plex zone uses it to share my plex library.

Read More...


djbdns on SmartOS

Posted by Dave Eddy on Apr 27 2015 - tags: tech

djbdns is a software package for running a secure, fast, and simple DNS server.

djbdns is not actually a program itself, but instead is a collection of programs that can be used together to create a full caching, forwarding, and authoritative DNS system - this post will show how to setup all the necessary programs on SmartOS to mimic my home setup.

I use djbdns at home to give me:

  1. DNS lookups for my internal network: rapture.com and 10.X.X.X
  2. DNS caching daemon for quick look ups: it forwards to OpenDNS and caches the results

Installation

To install the suite of tools, run

pkgin in djbdns gmake

Note: the GNU version of make isn’t needed specifically, any implementation will suffice.

This will install a lot of programs, but the most important are:

  • tinydns: a DNS server daemon
  • dnscache: a recursive DNS caching daemon

The next step is to create the configuration directory which will be used later

mkdir -p /opt/local/etc/djbdns

Read More...


Case Study for Bash and Node - __dirname

Posted by Dave Eddy on Apr 13 2015 - tags: tech

__dirname is a variable that is available to all scripts that are run by Node.JS - it contains a string that refers to the directory name where the currently executing script is contained. The variable is set on a per-file basis, so any script that is sourced using require will have its own __dirname variable that points to the directory where the script itself is contained.

Example In Node

Take the following node script located at /tmp/node-one

console.log(__dirname);

When executed, we can see

$ node /tmp/node-one
/tmp
$ cp /tmp/node-one /var/tmp/node-one
$ node /var/tmp/node-one
/var/tmp
$ cp /tmp/node-one ~/node-one
$ node ~/node-one
/home/dave

And, when using require, given the following script in ~/two.js

require('/tmp/node-one');

When executed, we can see

$ node ~/two.js
/tmp

Even though ~/two.js resides in /home/dave, it prints /tmp becasue the script being sourced resides in /tmp.

Because of this behavior, it is very easy and elegant for node scripts to require one another without needing to know an absolute path ahead of time. By using only relative require statements, all paths will be made relative to __dirname implicitly.

Problems

This behavior however, relies on very specific situations for the script to be executed. Imagine the case where node does not know where the JavaScript bytes are coming from. For example, using the original node-one script above:

Read More...


WeeChat perl plugin on SmartOS

Posted by Dave Eddy on Mar 30 2015 - tags: tech

Here’s a quick hack to get the perl plugin working for WeeChat on the latest (2014Q4) [SmartOS] (http://smartos.org)

weechat is now in pkgsrc, but it appears to have been built without perl support, which renders certain plugins not working with errors like:

/script install pushover.pl
script: script "pushover.pl" can not be installed because plugin "perl" is not loaded
/plugin load perl
Error: unable to load plugin "perl": ld.so.1: weechat: fatal: perl: open failed: No such file or directory
If you're trying to load a script and not a C plugin, try command to load scripts (/perl, /python, ...)

How

To quickly work around this:

1 install weechat from pkgsrc

pkgin in weechat

This will install weechat without the perl plugin

2 compile weechat at the same version from source

wget https://weechat.org/files/src/weechat-1.0.tar.gz
tar xzf weechat-1.0.tar.gz
cd weechat-1.0
mkdir build
cd build
cmake ../ -DPREFIX=/opt/local
make

THIS WILL FAIL, version 1.0 does not compile cleanly on SmartOS. However, perl.so has been built, which is all we need

3 move the plugin into place

sudo cp ./src/plugins/perl/perl.so /opt/local/lib/weechat/plugins/

4 it works

/plugin load perl will now work as expected

todo

  1. have weechat in pkgsrc built with perl support - https://github.com/joyent/pkgsrc/issues/252
  2. fix weechat build problems on SmartOS - https://github.com/weechat/weechat/issues/381

Human Readable Duration in Bash

Posted by Dave Eddy on Jun 29 2014 - tags: tech

show seconds in a human-readable form using pure bash

This function provides a simple way to turn a number of seconds into a human readable form using minutes, hours, days, etc. For example.

$ human 50
50 seconds
$ human 600
10 minutes
$ human 75890
21 hours
$ human 475890
5 days
$ echo "bash has been running for $(human "$SECONDS")"
bash has been running for 2 minutes

The Code

human() {
    local seconds=$1
    if ((seconds < 0)); then
        ((seconds *= -1))
    fi

    local times=(
    $((seconds / 60 / 60 / 24 / 365)) # years
    $((seconds / 60 / 60 / 24 / 30))  # months
    $((seconds / 60 / 60 / 24 / 7))   # weeks
    $((seconds / 60 / 60 / 24))       # days
    $((seconds / 60 / 60))            # hours
    $((seconds / 60))                 # minutes
    $((seconds))                      # seconds
    )
    local names=(year month week day hour minute second)

    local i
    for ((i = 0; i < ${#names[@]}; i++)); do
        if ((${times[$i]} > 1)); then
            echo "${times[$i]} ${names[$i]}s"
            return
        elif ((${times[$i]} == 1)); then
            echo "${times[$i]} ${names[$i]}"
            return
        fi
    done
    echo '0 seconds'
}

MIT License


Cross-Platform Implementation of which

Posted by Dave Eddy on May 22 2014 - tags: tech

binfind

find the path of a binary in your PATH using only bash

The tool which(1) has many different implementations on many different operating systems. Because of this, its output and return codes are not well-defined, and should not be trusted in the context of a script. However, it is often desirable to determine if an executable exists on a filesystem, without having to fork the executable itself to test.

The algorithm which(1) uses is fairly simple: loop over all paths found in the environmental variable PATH, and test for the existence, and executable bit, of the binary in question.

The function below will search your PATH for the binary name given as the first argument, and print the full path of the first binary found and return 0 if it is successful. Otherwise, it won’t print anything, and will return 1.

binfind() {
    local paths path
    IFS=: read -a paths <<< "$PATH"
    for path in "${paths[@]}"; do
        path=${path:-.}/$1
        if [[ -x $path ]]; then
            echo "$path"
            return 0
        fi
    done
    return 1
}

Example usage

$ binfind echo
/bin/echo
$ binfind clang
/usr/bin/clang
$ binfind foobar
$ echo $?
1

Directory Management with cd

Posted by Dave Eddy on Sep 14 2013 - tags: tech

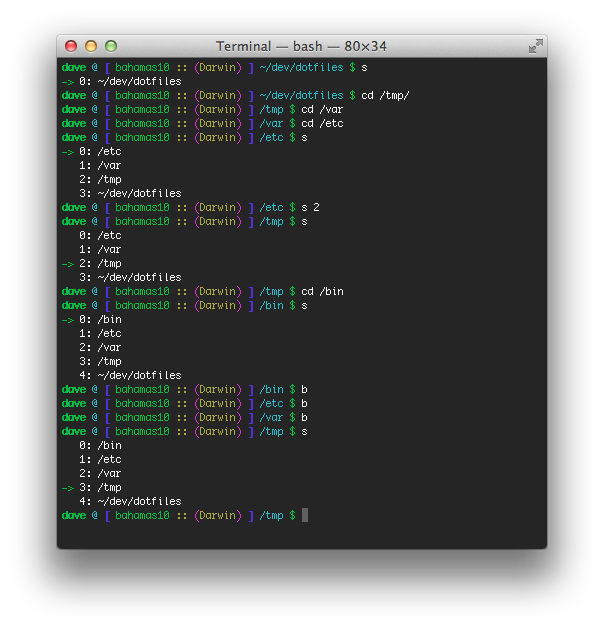
You cd around like you normally would, and the directories are pushed into a stack. Use the function s to view the stack of directories, and run s "$num" to cd into the directory listed. Use b to jump back 1 directory.

I was inspired by this article written by Derek Wyatt about directory management in BASH. The code I’ve written for this accomplishes most of the same tasks, but does so with about 1/3 of the code, as this was written specifically for BASH (no legacy KSH bits) and doesn’t implement any of the fancier features for cd.

Example

In the above example I cd around a bit, and then run s to see what the current stack looks like. The current stacks shows all of my previous directories in reverse order (limited to $CD_STACK_MAX entries, which defaults to 15).

The code is on GitHub here https://github.com/bahamas10/bash-cdstack